Keg Resources Logo

Wednesday, October 13, 2010

Set up the Kegerator for your function

Kegerator Operating Instructions

For your function


If possible use a pre-chilled keg. The kegerator will take 24 hrs to pull a non-chilled keg down to 2 degrees.

Also try to allow the keg to rest after transportation.
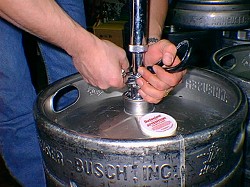

Attach the keg

Place the keg inside the kegerator gently.

Ensure the keg coupler handle is in the upright (OFF) position.

Align the two coupler lugs with the corresponding openings in the keg valve.

Insert the keg coupler and turn clockwise to engage into position (about 90 degrees).

Press the handle downward (ON) this will allow gas to enter the keg and beer to flow

out of the keg


Set the temperature

When the kegerator has been powered off, the temperature resets to 41 degrees F approx 5 degree C.

Adjust the temperature down to 2 degrees C by pressing the grey button to toggle between F and C. Use the grey down arrow, temperature will flash while you are adjusting. Press arrow button until 02 shows. It will then stop flashing and save until powered off.

Attach the CO2

Use a large spanner or wrench and adjust only until no CO2 leaks, please don’t over tighten. Ensure the white plastic washer is intact inside the nut.

Turn on the gas at the cylinder and turn the red lever on the regulator so it points along the line.

Check the Regulator

We have set the PSI of the regulator for around 10- 13, this should be fine for almost every beer. It has been tightened, if in the rare event you need to adjust it, remember if you are reducing the pressure you need to release the pressure using the valve on the side of the regulator to get a correct reading.

It may pay to release the pressure in the keg by “burping” it with the valve in a similar fashion with the gas turned OFF.

Check lines for leaks

Listen next to the coupler, you will hear gas escaping if there is a leak. Ensure the top of the coupler is tight.

Test pour

Often the first pour and after sitting for several hours unused will be frothy. Pour about a half glass off first and stop. Then continue in a fresh glass.

If it is consistently frothy (too much PSI)or slow and no head (not enough PSI) you may adjust the PSI, using small adjustments. Never use more than 20 PSI.


Enjoy your event.

Wednesday, September 15, 2010

Serving Wine from the Kegerator

We Have Successfully Converted The Kegerator into a WINE Dispensing Unit


Due to a request from a vineyard, we started development on a system for delivering wine utilising the Kegerator.


The Concept:

Use the Kegerator and by utilising alternate parts such as a cornelius keg, twin taps for say, a Sav and A Chardy inside the fridge or a White and Red (sitting outside the fridge, tube holes are builtin).


The gas needs to be different, nitrogen was selected as it is inert and oxygen free. This needed a different regluator and line splitters for the gas to supply 2 kegs.


Read on for More Info

Thursday, August 5, 2010

Keg Hand Truck Under Development

Introducing the keg Resources Designed Keg Handtruck

We developed this prototype in conjunction with the nationwide delivery contractor for a national brewery.
We discussed the issues with stairs and very heavy kegs and implemented a second set of wheels to act as a buffer.
We are currently trialing them with 1 unit shared to 3 trucks and the feedback so far is great, it simplifies the job of both up and down stairs rather than scraping and damaging the stairs.

Of course it is good for any person needing to get gear up and down stairs.

A bit more detail and more pics after the jump

Monday, August 2, 2010

Update on Arrival of Our First Shipment

Just confirmed our shipment will be here on 8/8 and the gas bottles will be here 12/9.  Just in time for the home show.

Thursday, July 29, 2010

Kegerator Series 3 - Pics

This is our demo unit in the office, it is getting well used.

No issues so far except the beer keeps running out.

Expected shipment is 2 - 3rd week in August although the gas bottles from Poland will take till September.  Also this model has twin taps but we will be selling the single tap model as a default config.

BTW if you are in the neighbourhood (Wairau in Auckland) and want to try it out give us a call 09 443 7416 and come on in.

Wednesday, July 28, 2010

Our First Old Fridge Kegerator

We started developing our first Kegerator around 10 months ago on an old fridge, which Alex, our resident tool guy took to and produced an amazing looking specimen.

Painted in our Keg Resources corp colours (so to speak) it is fitted with a long shank tap and we have the drip tray ready to bolt on - we didn't want to scratch it.

Read more about the project, see some more pics and see what lead us towards our current Kegerator and why.....

Testing the Kegerator Pouring

We had a few people come round yesterday so I took the chance to pull out the video camera and grab a couple of quick takes.

This is our demo model, it has the twin tower/taps as per default for the Aussie home brewing market where they use the Cornelius kegs (often called ball lock).  http://en.wikipedia.org/wiki/Cornelius_keg

Our order on the boat at the moment will be the single tower/tap and couplings will be the standard NZ D type for all the NZ kegs from breweries.

However for no change in price we can swap back in the ball lock couplers and add a CO2 line splitter along with a twin tower/taps if you so desire in case you are using the cornelius kegs.

One of the crew, Gabriel consented to be our tester.  Needless to say our testing went on quite a while and was very rigorous.

Beer is Macs Gold


Closer

Another clip up closer


Well done Gabriel

Setting or Changing the Temperature

Here's a look at the temperature setting. Degrees C but can be changed to F.  Kegerator is set to 2, beer is nice and cold.